# 5. 如何进行数据存储和组件间通信
上一节,我们已将首页开发完毕,接下来将要进入简历制作,但在简历制作之前,我们先将数据存储模块加以实现。让我们思考篇一个问题点:
简历平台最重要的是什么:数据!重启应用,你是否期望应用能恢复你上次的数据信息?
# 实时性数据存储
我们通过 redux 进行数据状态管理,为了避免繁琐的操作,采用 rc-redux-model 进行辅助开发。
# 1. 安装
让我们先来安装一下
npm install redux | |
npm install rc-redux-model --save-dev // 👉 安装这个库,简便 redux 操作 | |
npm install redux-logger --save-dev // 👉 安装这个库,让我们在控制台看到 redux 数据 |
安装完成后,我们在 app/renderer 文件夹下,新增一个名为 store 的文件夹,存放着所有 redux model 相关的代码文件。在里面新增一个文件名为 index.ts ,该文件主要引入我们所有的 model,经过 redux 的 API,导出一颗完整的数据状态树。(看下面代码注释)
// renderer/store/index.ts | |
import logger from 'redux-logger'; | |
import RcReduxModel from 'rc-redux-model'; | |
import { createStore, applyMiddleware, combineReducers } from 'redux'; | |
// 👇 引入我们写好的 model | |
import globalModel from './globalModel'; | |
// 👇 这里只需要调用 RcReduxModel 实例化一下得到最后的 reduxModel | |
const reduxModel = new RcReduxModel([globalModel]); | |
// 👇 无侵入式的使用 Redux,即使你写最原始的 reducer 也照样支持 | |
const reducerList = combineReducers(reduxModel.reducers); | |
export default createStore(reducerList, applyMiddleware(reduxModel.thunk, logger)); |
上面我们引入了 ./globalModel ,那么我们在 store 文件夹下,追加一份 globalModel.ts 文件。
// renderer/store/globalModel.ts | |
const globalModel = { | |
namespace: 'globalModel', | |
openSeamlessImmutable: true, | |
state: { | |
appName: '简历应用平台', | |
}, | |
}; | |
export default globalModel; |
通过 rc-redux-model 官方文档介绍:在 model 中,action 以及 reducer 我们均可忽略不写。只需要定义好 state 值即可。
到目前为止,我们已经将 redux 文件信息创建好了,接下来在项目中使用,不过在使用前,先捋一下 react、redux、react-redux 的关系。
# 2. 为什么要用 react-redux
当多个组件需要进行数据共享,交换双方的数据,唯一的解决方案就是:提升 state,将原本兄弟组件的 state 提升到共有的父组件中管理,由父组件向下传递数据,子组件进行处理,通过回调函数回传修改 state,这样的 state 一定程度上是响应式的。redux 也是这样的原理!
要知道 redux 是不区分技术栈的,意味着你也可以在 vue 中使用,只是我们经常搭配套餐使用 react。如上述的代码,我们通过 createStore 导出了数据状态树后,在组件中,我们如何得到数据值呢?只能通过 redux 提供的 store.getState() API,意味着我们每个组件都需要写:(下面为伪代码)
import store from './store/index.ts'; | |
function Home() { | |
// 👇 每个组件都需要这么写才能拿到数据 | |
const state = store.getState(); | |
} |
另一种方式是你可以在根组件获取 store,通过 Props 层层传递,如果你中间组件断层,没传递 Props,就会导致下层组件获取不到值,为了在使用上简洁方便,我们才引入了 react-redux 库。
让我们安装一下
npm install react-redux
# 3. 在组件中使用 redux
当你捋清楚三者关系并安装 react-redux 之后,接下来在组件中使用 redux 不再是困难的事。我们将经过 createStore 生成的 store 挂载到 react-redux 提供的 Provider 组件上,这个 Provider 的工作任务是:通过 context 向子组件提供 store。
多说无益,上手试试,我们进入根组件 app.tsx 将其进行修改
import React from 'react'; | |
import ReactDOM from 'react-dom'; | |
import Router from './router'; | |
// 👇 引入 store | |
import store from './store'; | |
// 引入 Provider | |
import { Provider } from 'react-redux'; | |
function App() { | |
return ( | |
<Provider store={store}> | |
<Router /> | |
</Provider> | |
); | |
} | |
ReactDOM.render(<App />, document.getElementById('root')); |
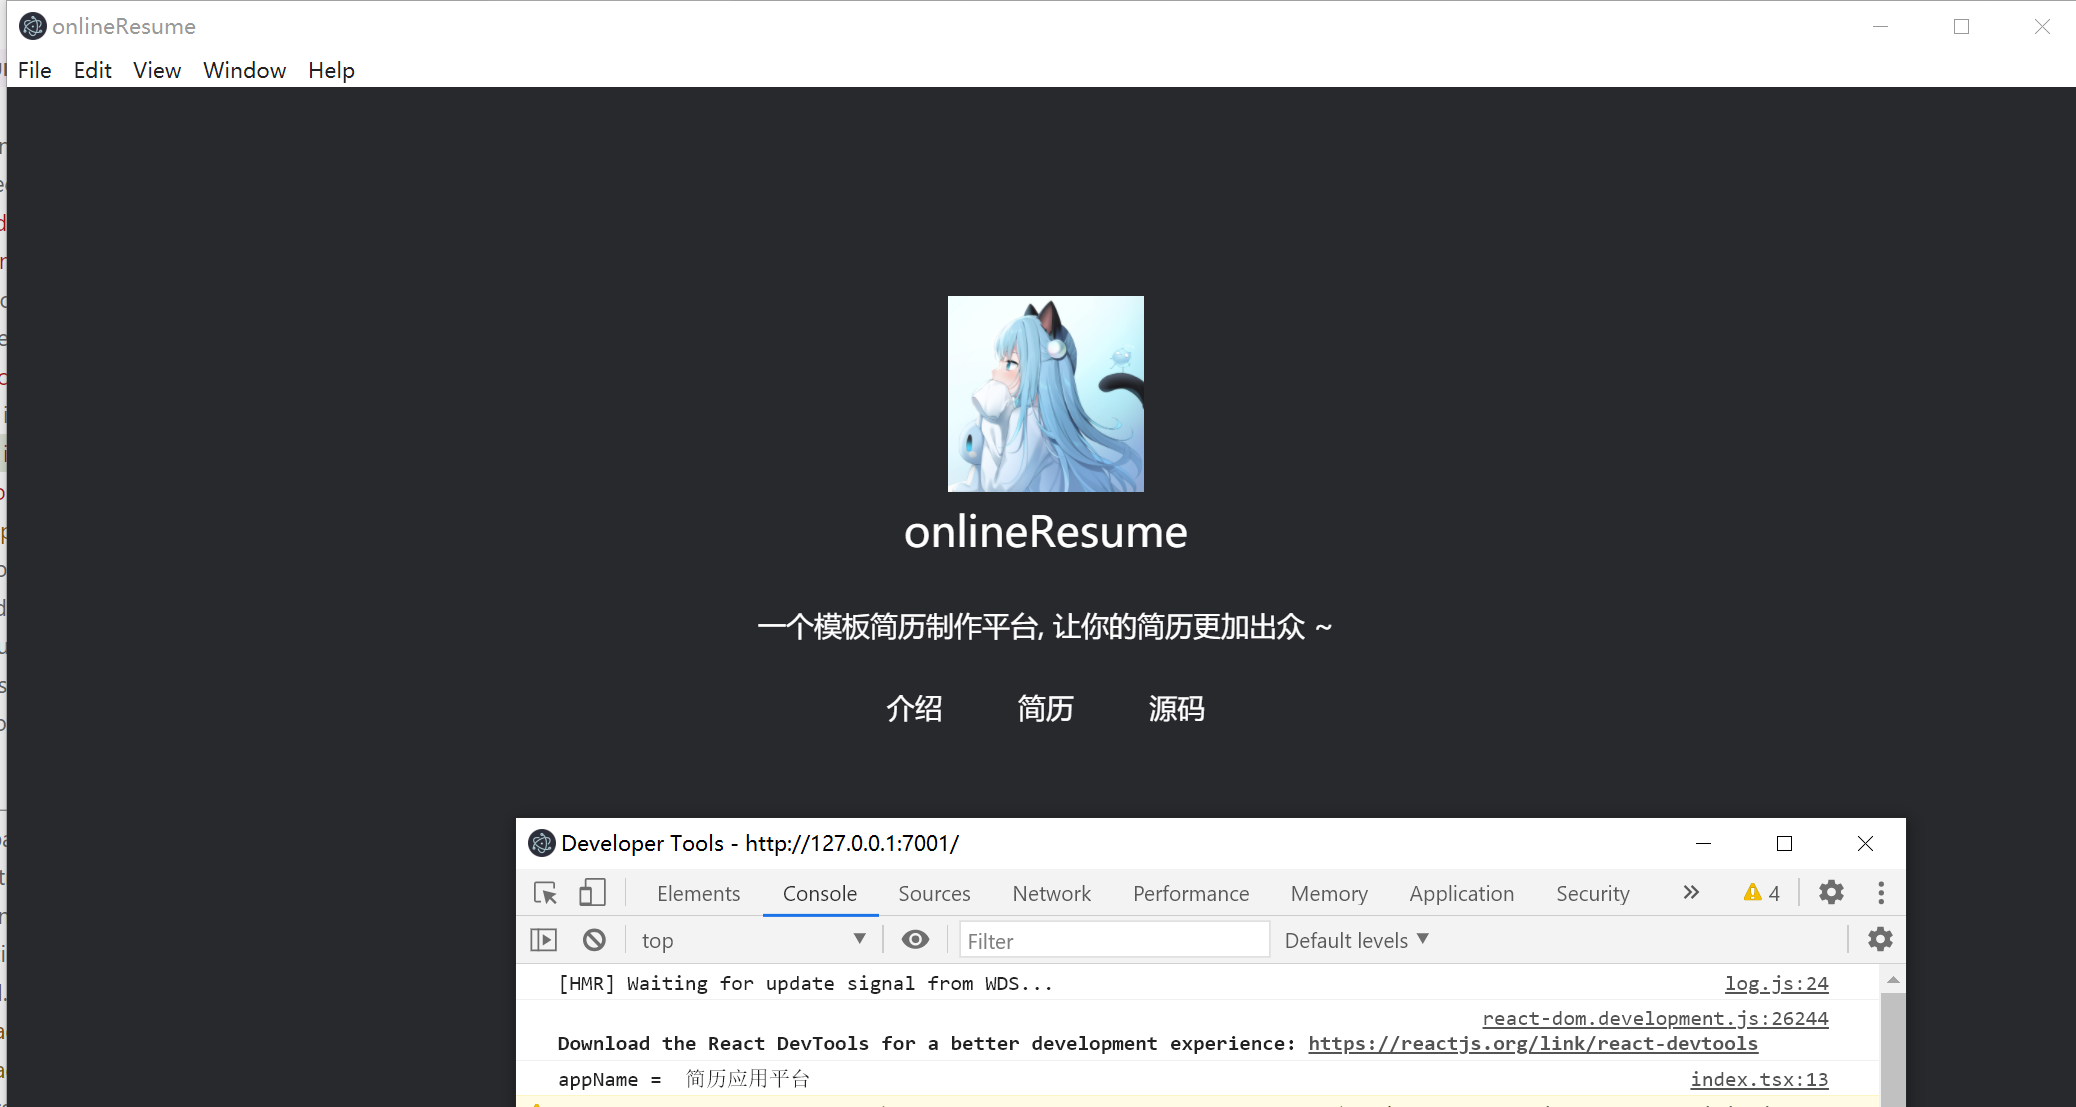
刷新一下页面,没有发生报错,也不会出现白屏,接下来我们在首页入口模块获取一下 redux 中的数据吧~ 上面我们已经给了一个初始值, appName="简历应用平台" ,我们修改一下首页模块的 index.tsx
// renderer/container/root/index.tsx | |
import { useSelector } from 'react-redux'; | |
function Root() { | |
const appName = useSelector((state: any) => state.globalModel.appName); | |
console.log('appName = ', appName); | |
} |
刷新一下页面,打开控制台,看看打印的数据,很完美符合我们的预期。

# 4. 在组件中修改 redux
既然可以获取 redux 数据值,自然而然地,我们也需要修改 redux 的值。在 redux 官方文档中,很明确提到:唯一改变 state 的方法就是触发 action。
通过 dispatch 发起一个 action 就能修改 state 值,但仔细一想,每个 state,都对应一个 action,在简历这种多 state 值下,这是不是很麻烦呢?得益于 rc-redux-model, 它提供一个 action API,只需记住一个 action,就能修改 state 的任意值 。接下来我们来修改一下
// renderer/container/root/index.tsx | |
import { useSelector, useDispatch } from 'react-redux'; | |
function Root() { | |
const dispatch = useDispatch(); | |
const appName = useSelector((state: any) => state.globalModel.appName); | |
useEffect(() => { | |
setTimeout(() => { | |
console.log('3s 后修改...'); | |
dispatch({ | |
type: 'globalModel/setStore', | |
payload: { | |
key: 'appName', | |
values: 'visResumeMook', | |
}, | |
}); | |
}, 3000); | |
}, []); | |
useEffect(() => { | |
console.log('appName = ', appName); | |
}, [appName]); | |
} |
解读一下上面代码,其中 useEffect 是 react 的 hook, 后期会增加相关内容。
我们在生命周期 didMount 中写了一段延时方法,在 3s 之后修改 appName,紧接着对 appName 进行监听,当它修改时,打印当前最新的值。小伙伴们猜测一下,3s 后数据是不是会发生改变呢?刷新页面,打开控制台,发现一切如我们预期一致。

至此,我们能够已经能够项目中使用 redux 进行实时性数据的存储,更多的使用在接下来的实战过程中会讲到。
# 持久性数据存储
我们采用文件形式进行持久性数据存储,最重要的就是对文件的增删改查,接下来,我们实现一套文件操作方法,需要支持的方法有:
- 文件的创建
- 文件的读取
- 文件的更新
- 文件的删除
- 文件是否存在
- 文件是否可读
- 文件是否可写
得益于渲染进程也能使用 NodeJS 模块,我们可以通过 fs 进行文件相关的操作。通过 Node 官网 我们发现大部分的函数方法都是通过回调函数的形式,将数据值返回,这样会造成 回调地狱 的形式。
仔细一想,通过 Promise 方式是否对我们更加友好?但好像改造成 Promise 又增加我们的工作量,有没有现成的 API 可用呢?在 Node 10 之后,提供了 fs Promises API ,这里我们通过官方提供的 API 即可实现 Promise 操作 fs 模块。
下面通过实战进行开发,这是一个通用的工具方法,并且期望对文件的操作都进行统一管理,我们可以在 renderer/common/utils 中,新增一个名为 file.ts 的文件
接下来我们封装一下 file.ts 的实现
// renderer/common/utils/file.ts | |
import fs, { promises as fsPromiseAPIs } from 'fs'; | |
const fileAction = { | |
read: (path: string, encoding: BufferEncoding): Promise<string> => { | |
return fsPromiseAPIs.readFile(path, { encoding: encoding || 'utf8' }); | |
}, | |
write: (path: string, content: string, encoding: BufferEncoding): Promise<void> => { | |
return fsPromiseAPIs.writeFile(path, content, { encoding: encoding || 'utf8' }); | |
}, | |
rename: (oldPath: string, newPath: string) => { | |
return fsPromiseAPIs.rename(oldPath, newPath); | |
}, | |
delete: (path: string) => { | |
return fsPromiseAPIs.unlink(path); | |
}, | |
hasFile: (path: string) => { | |
return fsPromiseAPIs.access(path, fs.constants.F_OK); | |
}, | |
canWrite: (path: string) => { | |
return fsPromiseAPIs.access(path, fs.constants.W_OK); | |
}, | |
canRead: (path: string) => { | |
return fsPromiseAPIs.access(path, fs.constants.R_OK); | |
}, | |
}; | |
export default fileAction; |
接下来我们在简历模块处,读取一下文件内容,修改一下 container/resume/index.tsx
// renderer/container/resume/index.ts | |
import React from 'react'; | |
import './index.less'; | |
import fileAction from '@common/utils/file'; | |
function Resume() { | |
// 👇 读取一下当前这个文件内容 | |
fileAction.read('./index.tsx').then((data) => { | |
console.log(data); | |
}); | |
return <div>我是简历模块</div>; | |
} | |
export default Resume; |
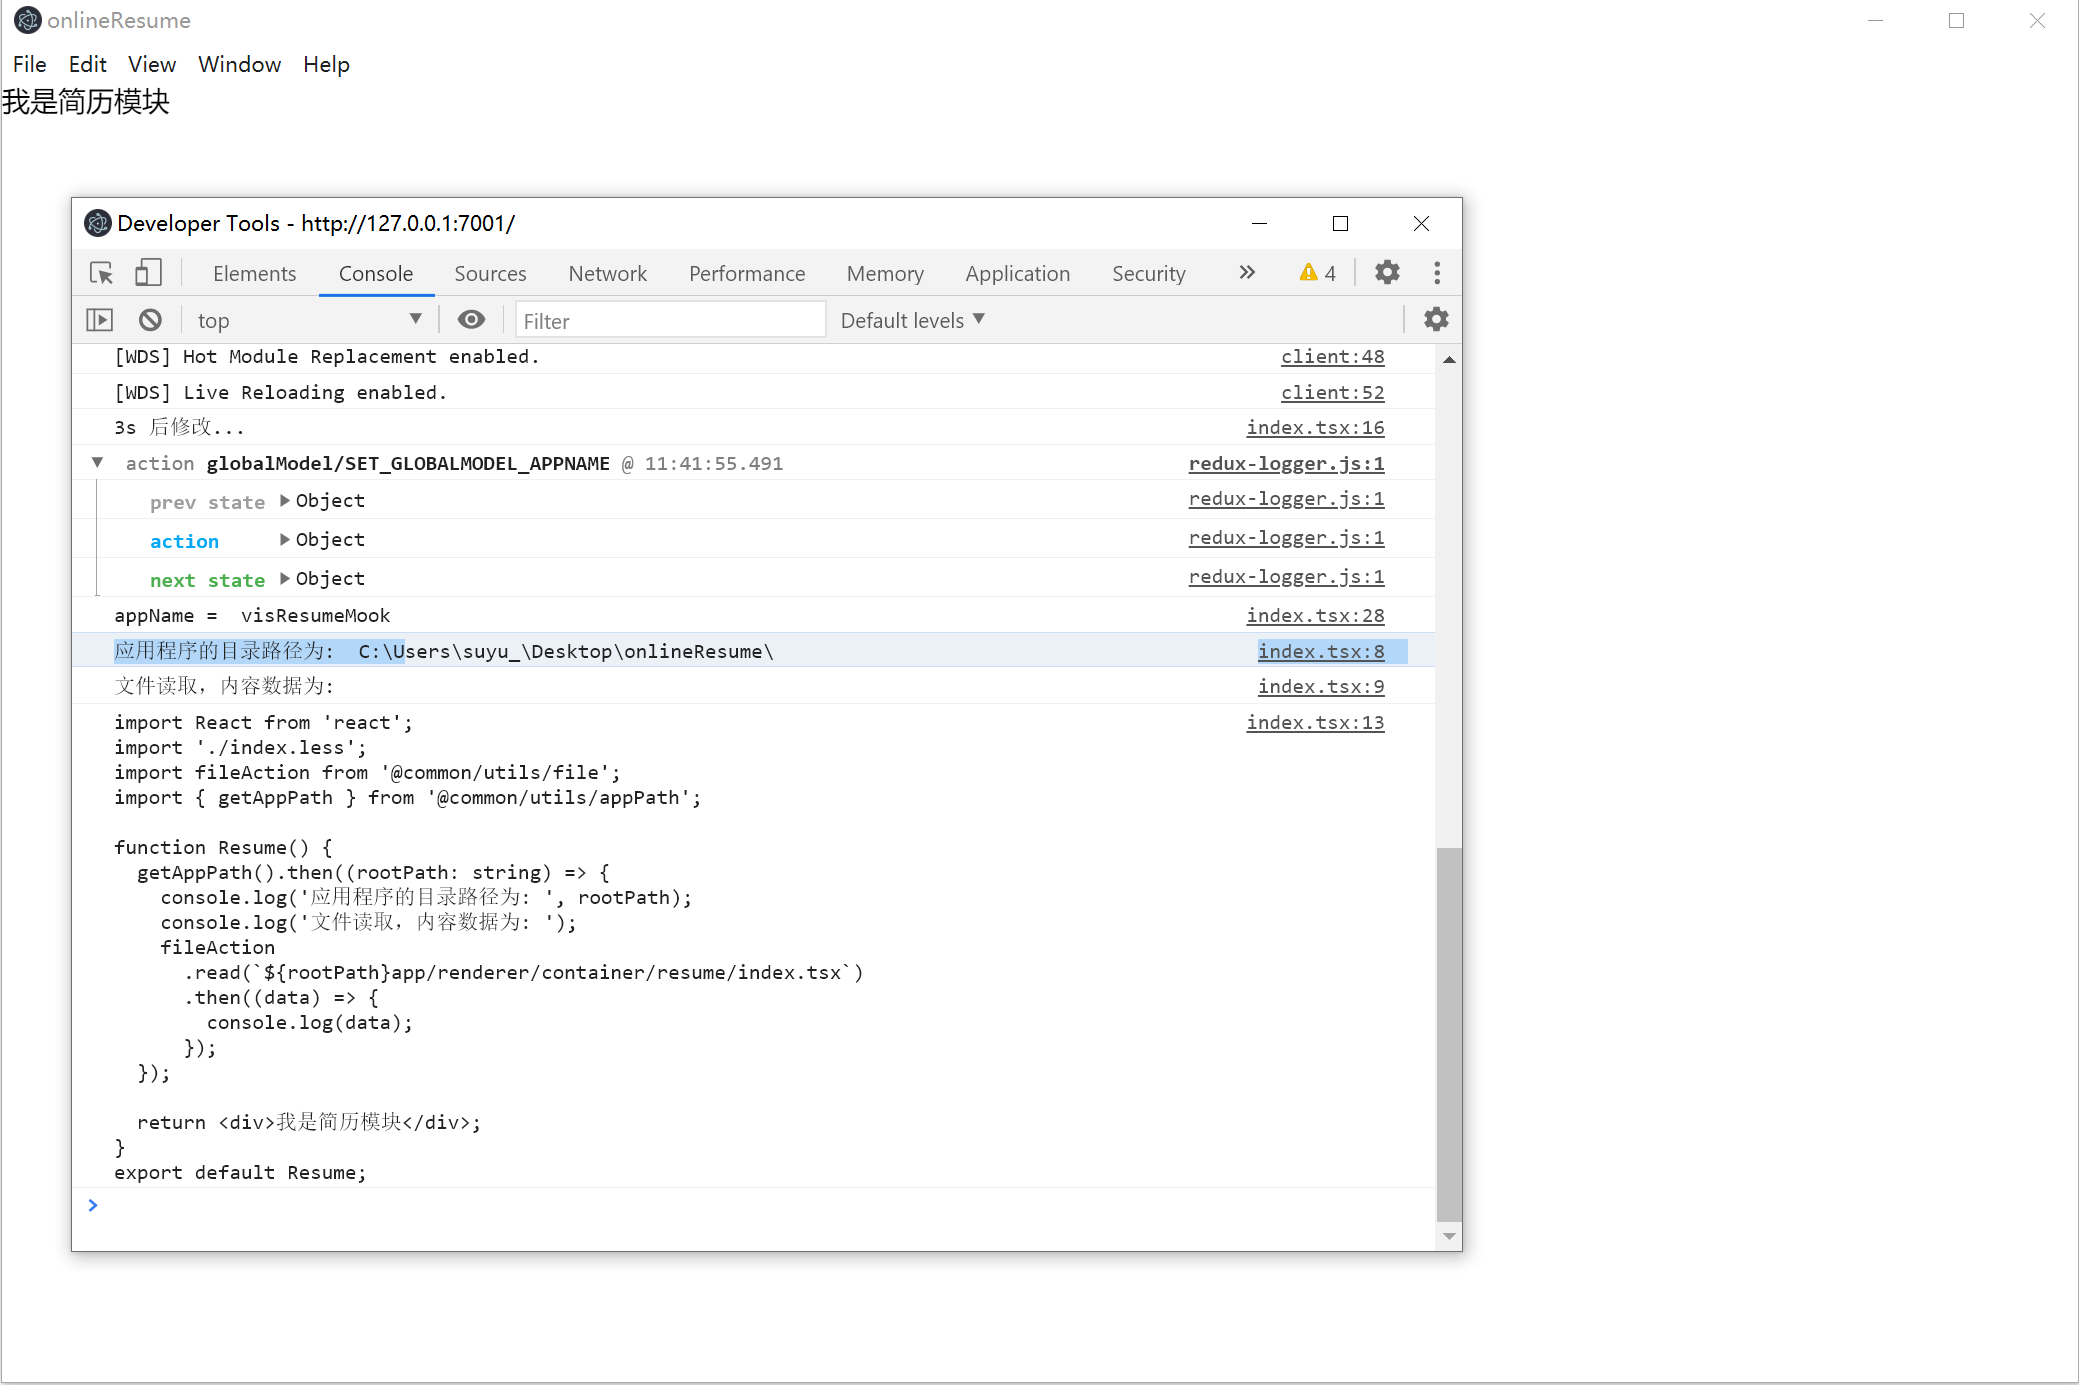
将项目跑起来,进入到简历路由页面下,看看控制台输出什么?
它读取的是项目根路径下的 index.tsx,但是在不同的系统中可能会出现偏差。为了抹平偏差需要获得相对路径。
electron 提供一个 app 模块,该模块提供了一个 getAppPath() 方法,用于获取当前应用程序在本机中的目录路径,但有个问题在于,该 app 模块仅能在主进程中使用,而我们期望在渲染进程中得到此目录路径,只能通过 IPC 进程间通信获取。
# IPC 获取应用程序所在的目录路径
在 utils 目录下,新增一个文件名为:appPath.ts,该文件用于获取项目的绝对路径。我们通过 Promise 来写一下它:
// renderer/common/utils/appPath.ts | |
// 监听主进程与渲染进程通信 | |
import { ipcRenderer } from 'electron'; | |
// 获取项目绝对路径 | |
export function getAppPath() { | |
return new Promise( | |
(resolve: (value: string) => void, reject: (value: Error) => void) => { | |
ipcRenderer.send('get-root-path', ''); | |
ipcRenderer.on('reply-root-path', (event, arg: string) => { | |
if (arg) { | |
resolve(arg); | |
} else { | |
reject(new Error('项目路径错误')); | |
} | |
}); | |
} | |
); | |
} |
接着我们在主进程中,通过 app 模块获取项目路径,通过 ipcMain 回复渲染进程,修改一下 app/main/electron.ts
import { app, ipcMain } from 'electron'; | |
const ROOT_PATH = path.join(app.getAppPath(), '../'); | |
// 👇 监听渲染进程发的消息并回复 | |
ipcMain.on('get-root-path', (event, arg) => { | |
event.reply('reply-root-path', ROOT_PATH); | |
}); |
这时候我们再回过头去简历模块处,稍微修改
import React from 'react'; | |
import './index.less'; | |
import fileAction from '@common/utils/file'; | |
import { getAppPath } from '@common/utils/appPath'; | |
function Resume() { | |
getAppPath().then((rootPath: string) => { | |
console.log('应用程序的目录路径为: ', rootPath); | |
console.log('文件读取,内容数据为: '); | |
fileAction | |
.read(`${rootPath}app/renderer/container/resume/index.tsx`) | |
.then((data) => { | |
console.log(data); | |
}); | |
}); | |
return <div>我是简历模块</div>; | |
} | |
export default Resume; |
结果
